Almost 4 years later, I started using AVR microcontrollers again. However, today it is difficult to find a computer that has a parallel port, and thus I needed to revisit this topic of AVR programmers. And I end up building (and buying) the USBasp (Wayback Machine) programmer.
Go to: part 1, part 2, part 2.1 (video), part 3, part 4 (video), source-code.
A little bit of history
Back in the early days, basically all computers had a parallel port (also called printer port) and a serial port. Even laptops had such ports (or had a “docking station” that added those ports to the laptop).
Then USB was born. And gradually everything moved to USB. And gradually the motherboards started having more and more USB ports. And also having on-board sound card, and on-board video card, and on-board ethernet adapter… And those “ancient” parallel and serial ports were becoming more and more useless. What’s more, they take up a lot of space in the back panel, space that was needed for all those new features added to the motherboards.
And then those ancient ports disappeared from the modern computers. And nobody cared, because nobody used them anymore.
How parallel and serial ports work
The parallel port was great for hobbyist projects because the hardware for interfacing with it was trivial. It had 8 output pins, each one mapped to one bit from a byte. So, the software could write a byte to the parallel port, and each one of those pins would be driven high or low. Pretty damn simple, and quite useful for small DIY hacks. It also had a few special pins that could be used for reading data.
The serial port was a bit more complicated because it implemented the RS-232 protocol, and thus it required a non-trivial hardware. On the other hand, once you had RS-232 implemented, using the serial port became quite simple. In a nutshell, you write bytes at one end, they are transmitted using the RS-232 protocol, and they arrive at the other end.
Analyzing the alternatives
Well, I don’t have those ancient ports anymore in my computer. How can I program my AVR microcontroller?
Using a USB Parallel port adapter
If you search the web (or your local computer hardware store), you will find quite a few USB Parallel Port adapters. They are a cable with a USB connector at one end and a DB-25 connector at the other end. Inside one of the connectors there is some circuitry to actually do the conversion.
At first, that seems like a good solution. However, after searching a bit more, I found that all such adapters behave as a USB printer. In other words, when you plug one of them, it shows up as a printer. The conversion chip inside the adapter emulates a printer and then sends some printing commands through the DB-25 connection.
It means that you don’t get true parallel port, and thus you can’t have full control of the port. If you can’t control the port, then you can’t “abuse” it for non-printing purposes, and thus it is useless for our needs.
Building a true USB Parallel port adapter
There is a project called USB2LPT (Wayback Machine) that claims to implement a virtualized parallel port that should work with hardware programmers. That seems to be a great project, congratulations to the author! However, it would be too much work for my purposes, and it also requires a custom driver.
Using a cheap, bit-banging serial port programmer
There are quite a few schematics for cheap serial port programmers:
- http://core.st/projects/Serial_programmer/ (Wayback Machine)
- http://microembeded.blogspot.com/2011/04/avr-serial-port-programmer.html (Wayback Machine)
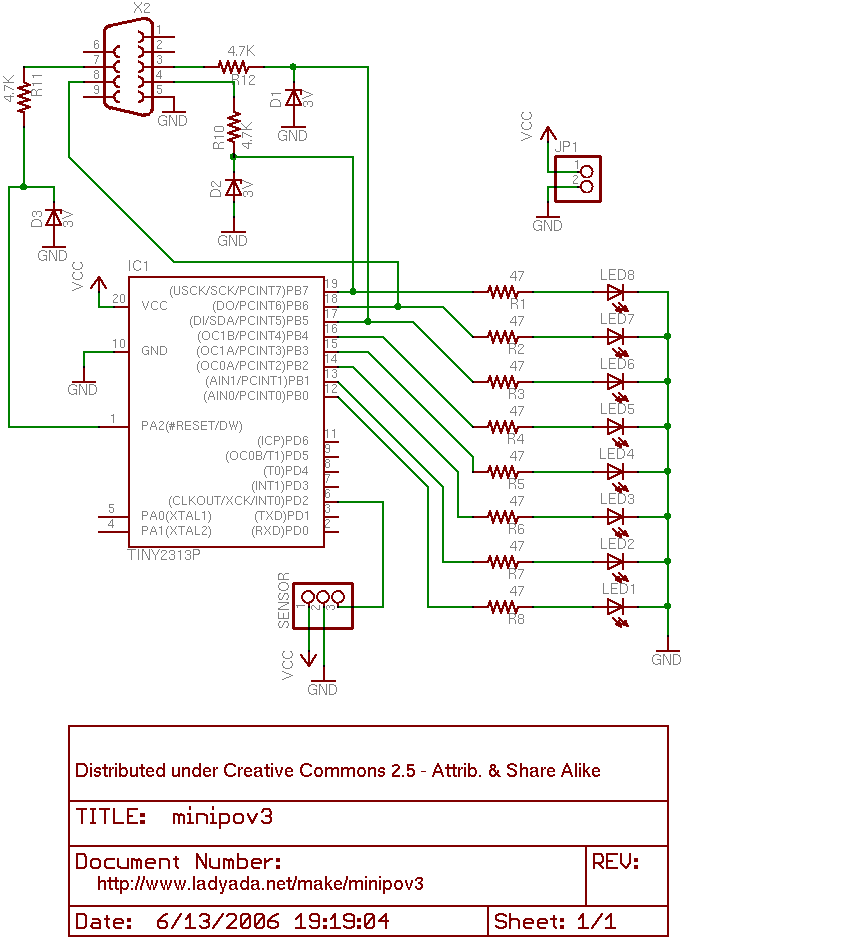
- http://www.ladyada.net/images/minipov3/minipov3schem.png (Wayback Machine)
- http://diy4fun.blogspot.com/2009/01/simple-serial-programmer-for-avr.html (Wayback Machine)
- http://www.lancos.com/siprogsch.html (Wayback Machine)
The UISP FAQ (Wayback Machine) and avrdude.conf file list some serial port programmers as dasa. They map pins from the serial port to pins of the ISP programmer.
They don’t actually implement the RS-232 protocol, but instead they abuse some characteristics of the port and the protocol in order to program the AVR microcontroller.
I’ve built one of those programmers (sorry, I don’t remember which one) and tried using it with a USB Serial Port adapter (contrary to the USB parallel port adapters, the USB serial port adapters actually emulate a full serial port, and should work well for most use cases). It didn’t work. Then I tried using it on an actual serial port from an old computer. It didn’t work. I tried using it with both UISP and avrdude tools. It didn’t work.
Maybe you might have better luck than me… But I strongly believe you shouldn’t waste time building a cheap serial port programmer. They are not reliable, and most likely won’t work. And if they work, they might not work on another computer.
Building a true RS-232 serial port programmer
Page 10 from AVR910 - In-System Programming document shows A Simple Low-cost In-System Programmer. It uses an AT90S1200 microcontroller to do the hardware+software conversion between the RS-232 and UART protocols (coming from the serial port) to the ISP protocol used by AVR microcontrollers.
I’m pretty sure this serial port programmer will work on most computers. However, there is no reason to build one nowadays. It’s way better to build one that talks to the USB port instead.
Using a USB programmer
This is the best solution. It is quite cheap, requires no extra adapters, and it works.
The cheapest and most popular USB programmer is USBasp (Wayback Machine). As the homepage says: “It simply consists of an ATMega48 or an ATMega8 and a couple of passive components.”
Buying USBasp
You can easily buy USBasp on eBay at a very low price. I bought mine for around 6 dollars (including shipping costs). You can even find a 10pin to 6pin ISP Adapter, just in case you need to use USBasp with a 6-pin header instead of 10-pin.
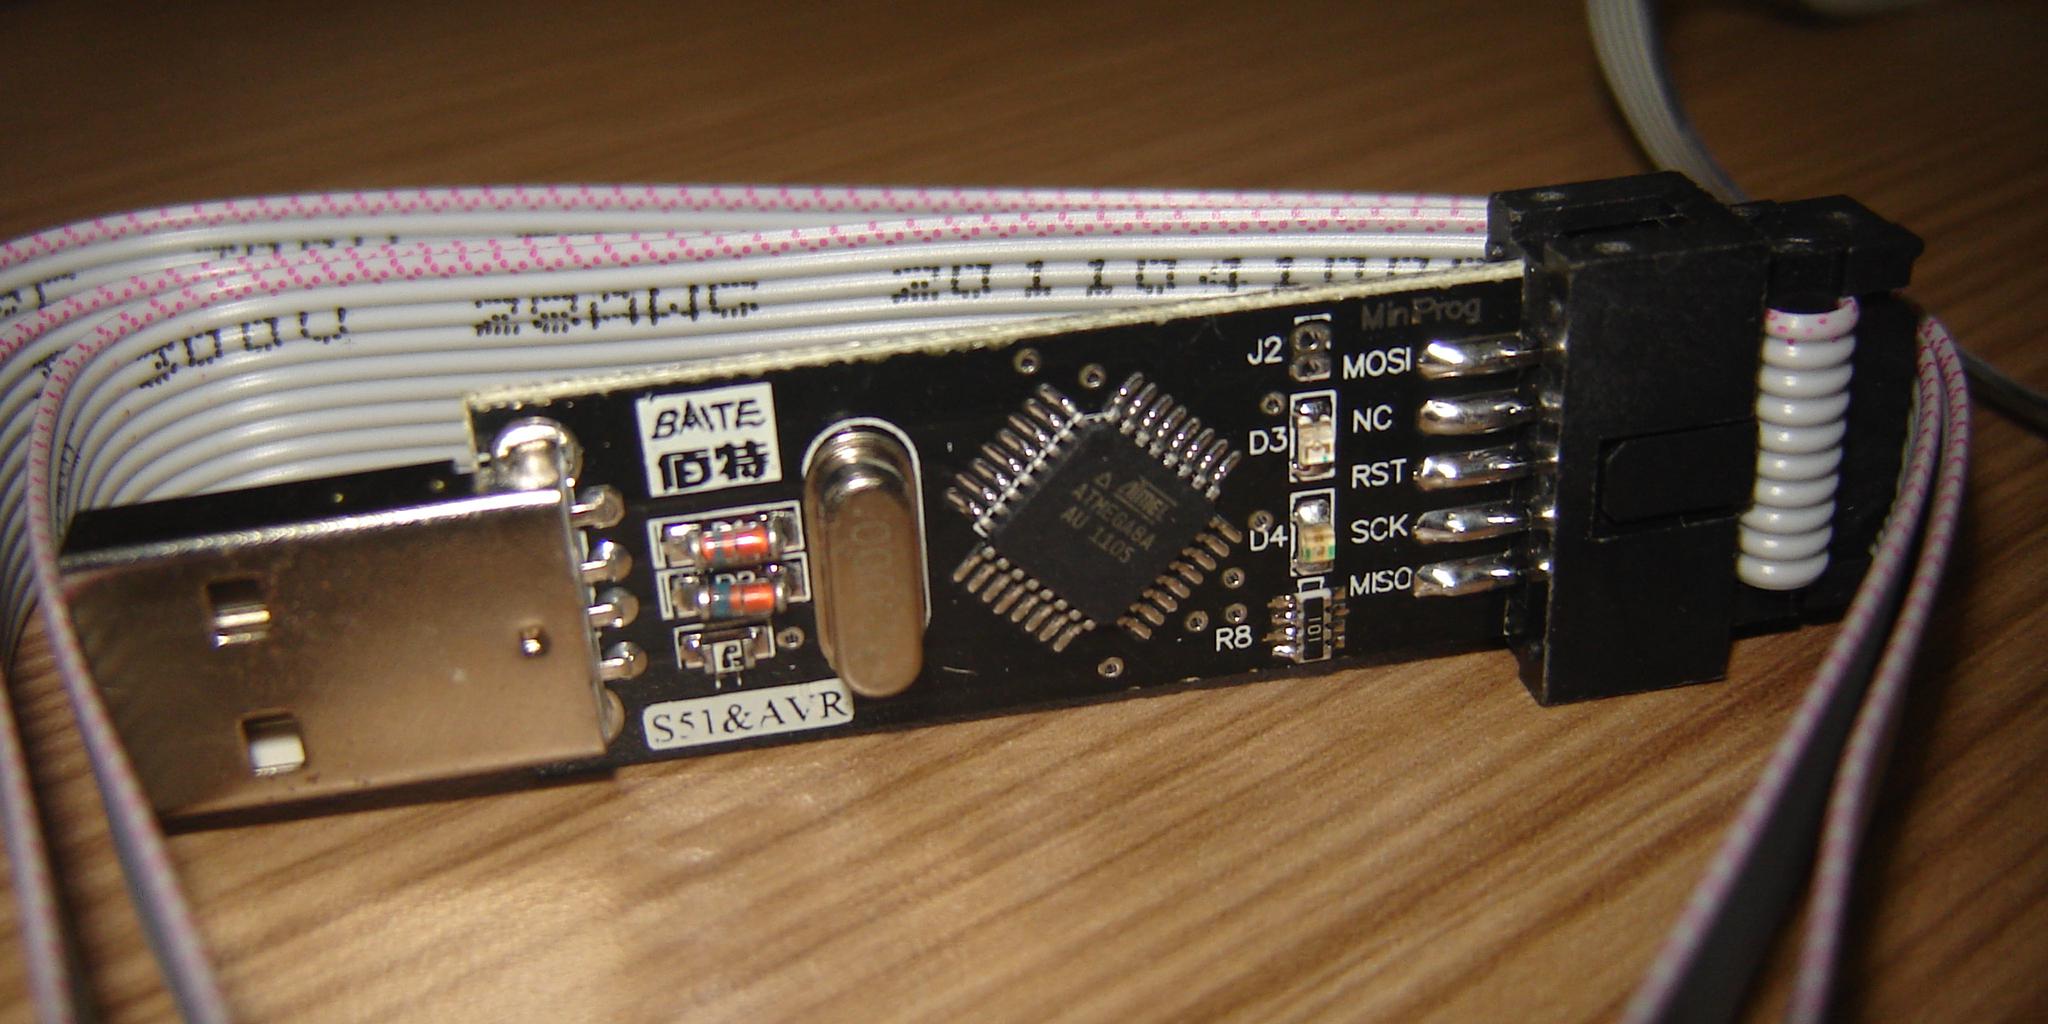
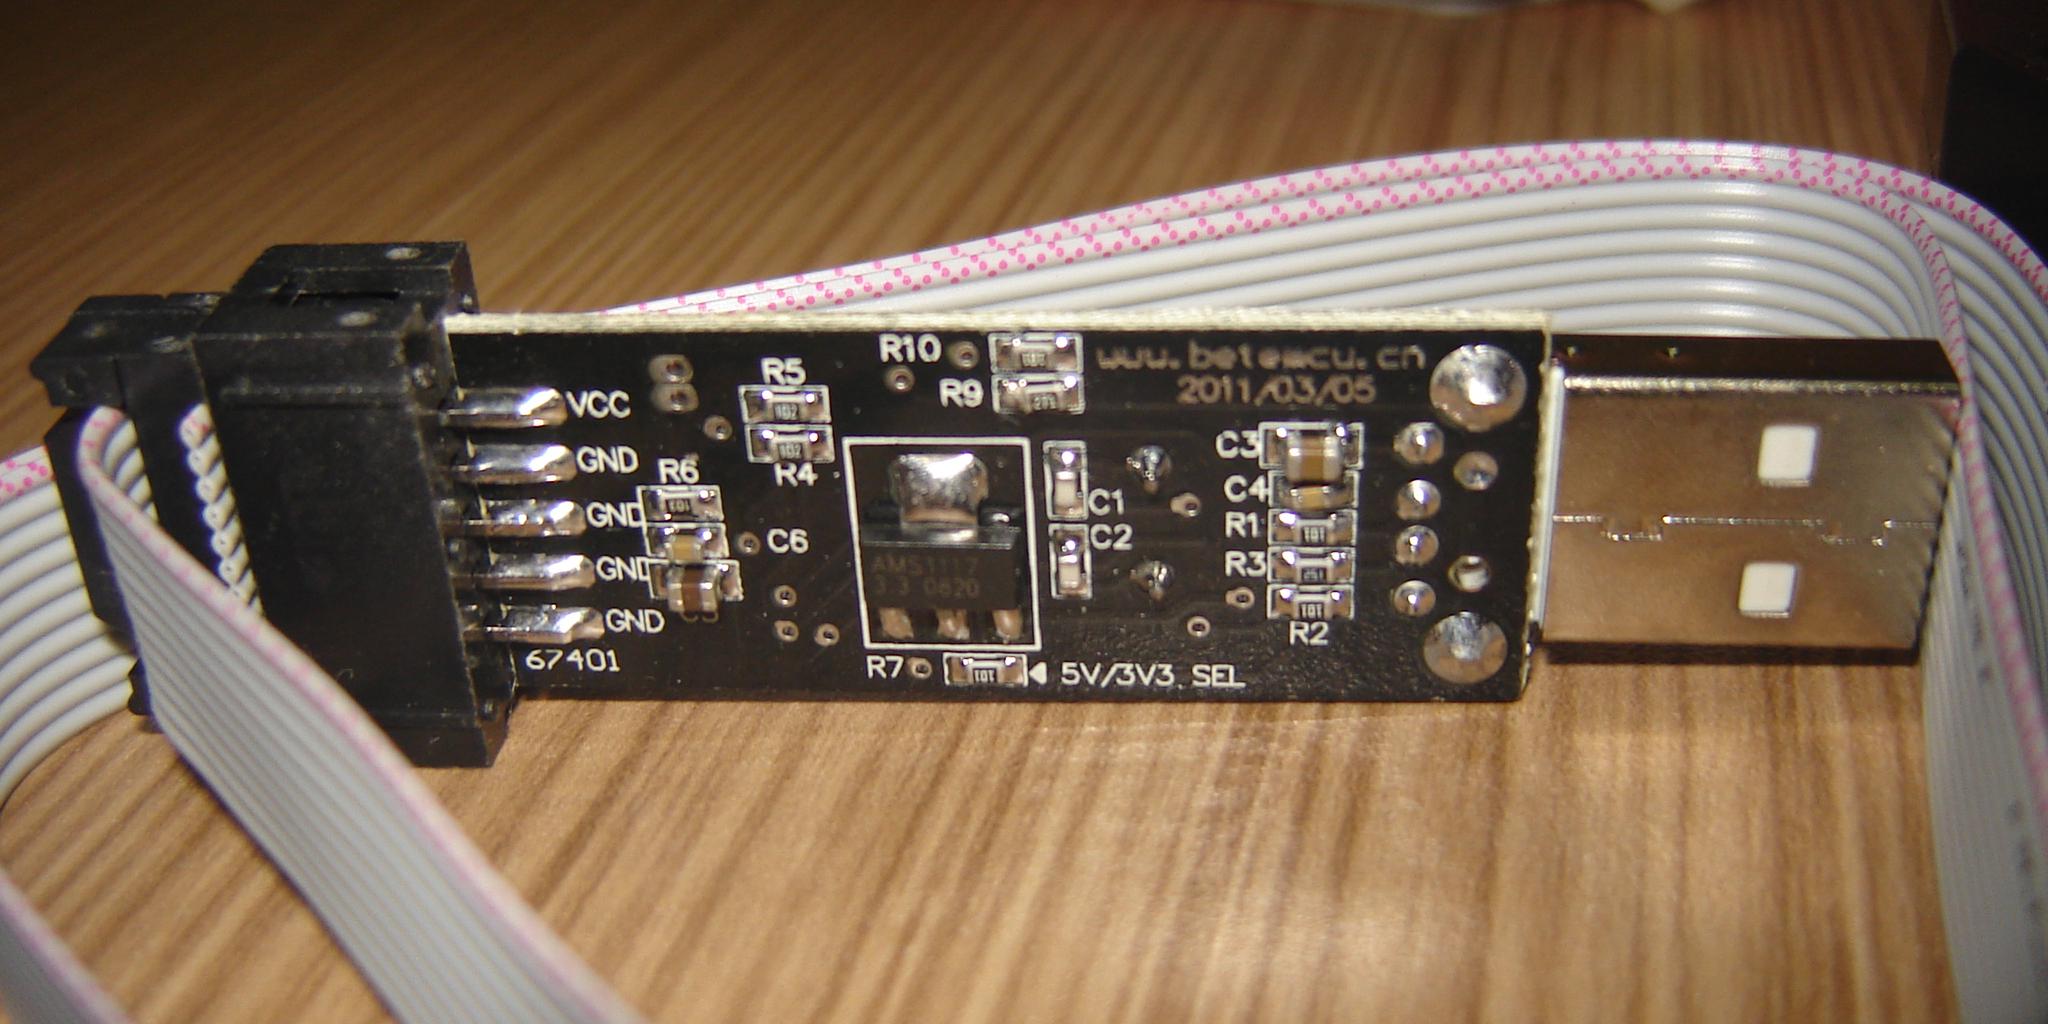
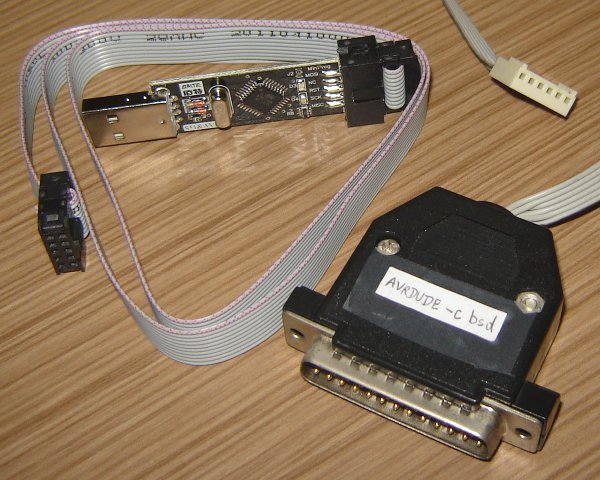
The programmer itself is very compact, and it comes with a 10-pin header cable. I’ve already described the 10-pin connector at part 2. If you remember, I said I couldn’t find such cable/connector when I was building my parallel port adapter, and thus I was forced to use another connector. Let’s compare my old parallel port adapter with the new USBasp that I bought on eBay:
Mounting USBasp on a breadboard
Okay, I bought USBasp from eBay. Great! But it takes about a month to arrive in my house. What should I do during this time? Maybe I should build one.
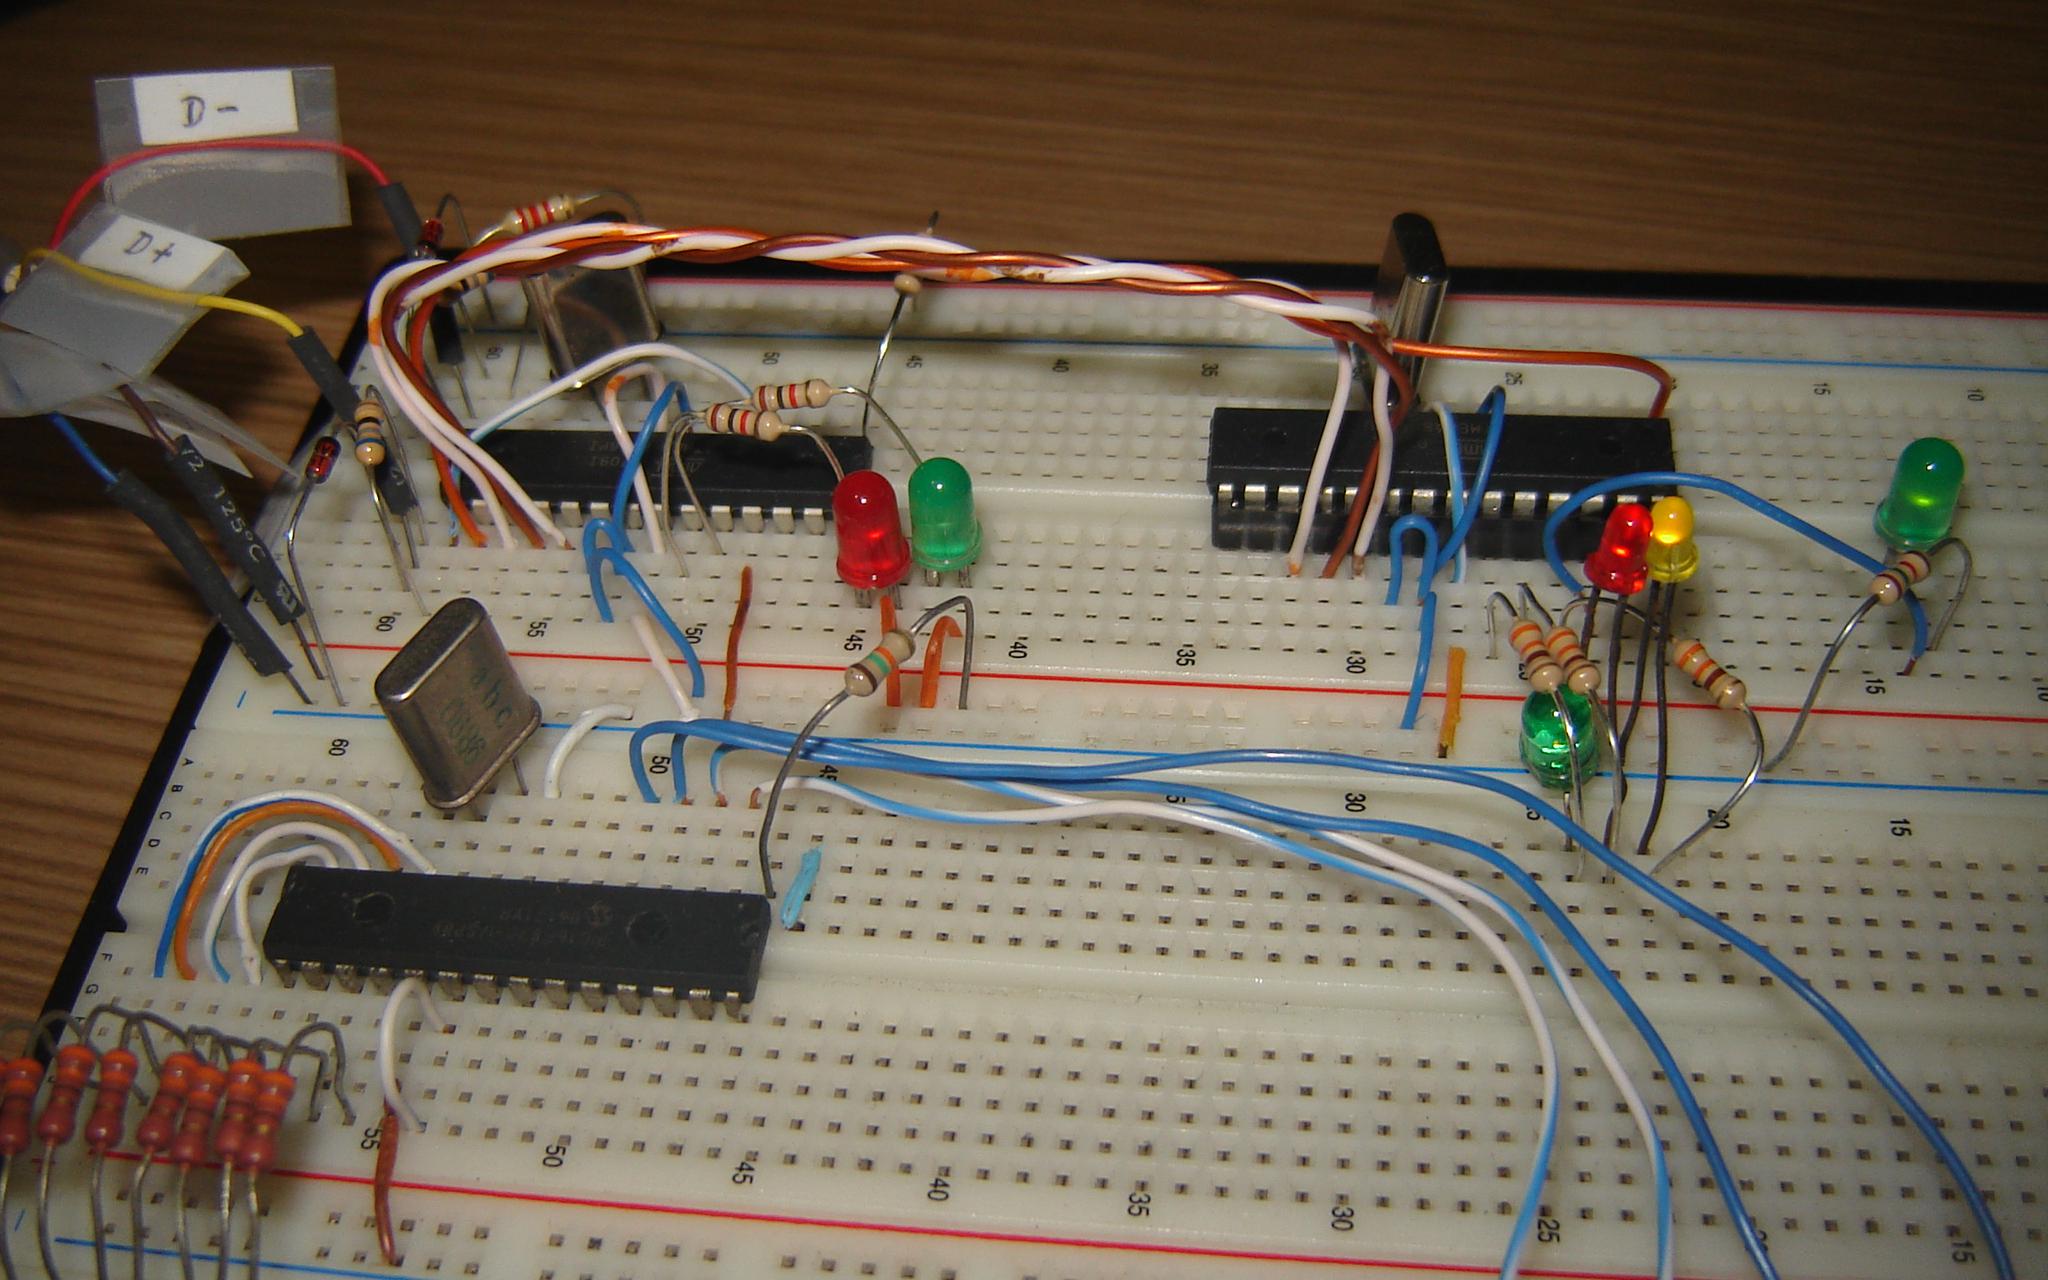
The USBasp circuit is so simple that it can be built directly onto a breadboard, and that’s what I did.
However, there is chicken-or-egg problem here: USBasp uses an ATmega8 microcontroller programmed with an specific firmware. But… How can I write the USBasp firmware in the first place? I solved this by using my old parallel port programmer (from part 2) with an old computer. It was the last time I used that old computer and that old parallel port programmer.
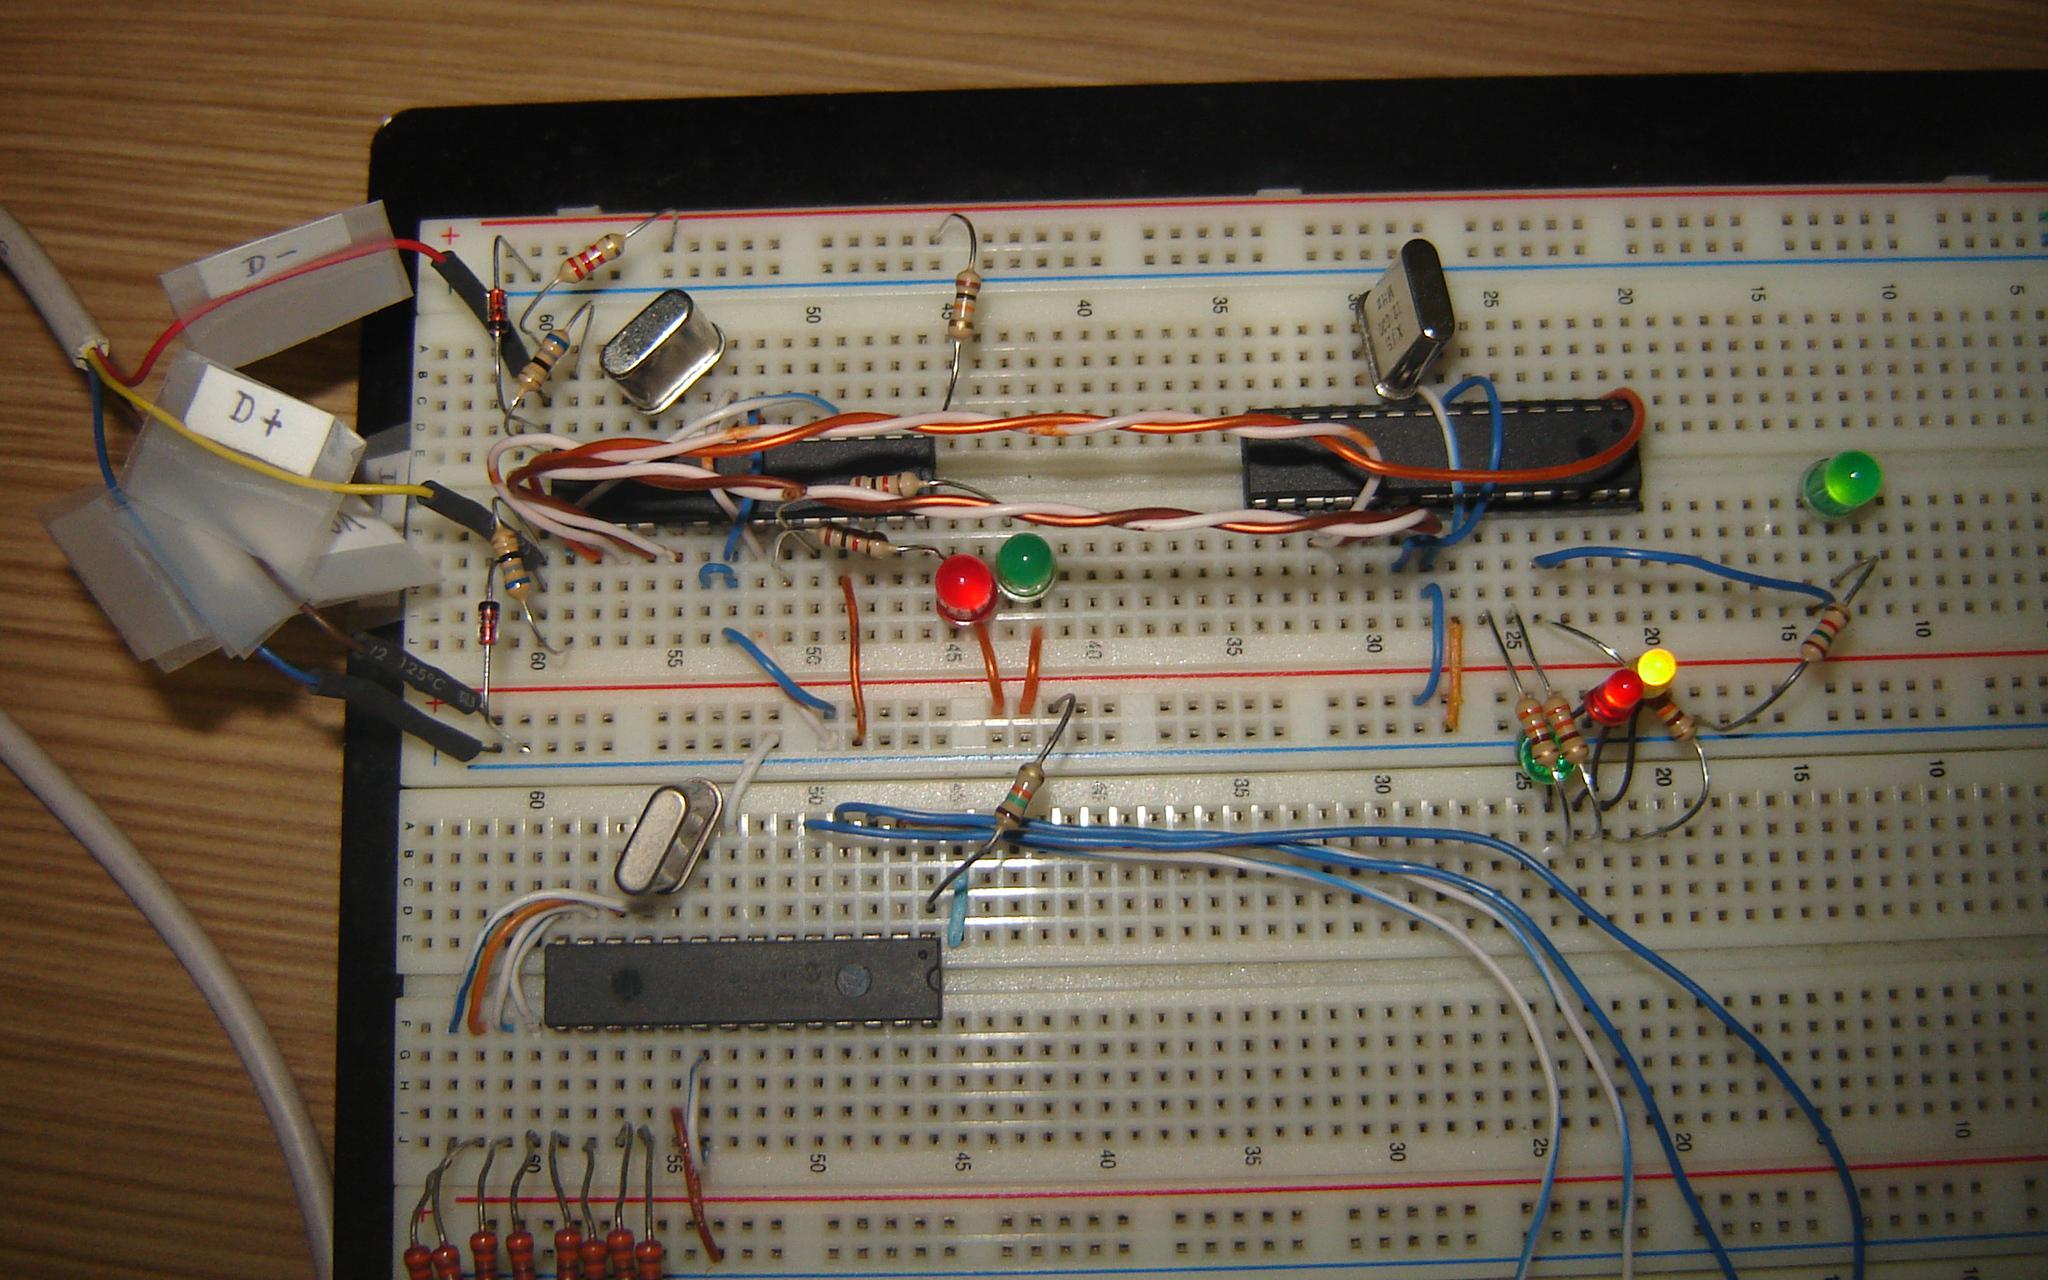
If you pay enough attention, you can identify two major parts on that breadboard: the USBasp circuit and the blinking LEDs circuit (from part 4). The crystal on that blinking LEDs circuit was not necessary (I just left it in there because I was going to need it for another firmware). You can also see a portion of another project that was still mounted on that breadboard (it’s completely unrelated to these posts, just ignore it).
If you observe carefully, the USBasp circuit is completely isolated from the blinking LEDs circuit, except for those 4 wires that connect to the programming lines of the ATmega8 (MOSI, MISO, SCK and RESET — remember that VCC and GND are available on those red and blue tracks from the breadboard).
Video proof
You can watch a video of this USBasp on a breadboard, showing that it actually works! :)
Also, as I’ve described at the end of the part 4, things might not work on the first try. This also happened here, as I misplaced a few wires in a couple of occasions, so it took me a few minutes before figuring out what was wrong and why it didn’t work.
Linux information
Upon connecting USBasp, the following lines show up in dmesg:
usb 6-1: new low speed USB device using uhci_hcd and address 6
usb 6-1: New USB device found, idVendor=16c0, idProduct=05dc
usb 6-1: New USB device strings: Mfr=1, Product=2, SerialNumber=0
usb 6-1: Product: USBasp
usb 6-1: Manufacturer: www.fischl.de
The following line shows up in lsusb:
Bus 006 Device 006: ID 16c0:05dc VOTI shared ID for use with libusb
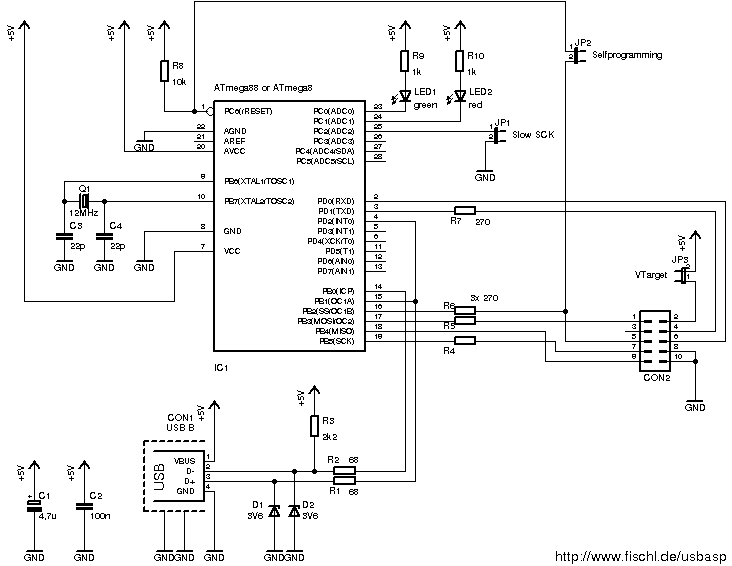
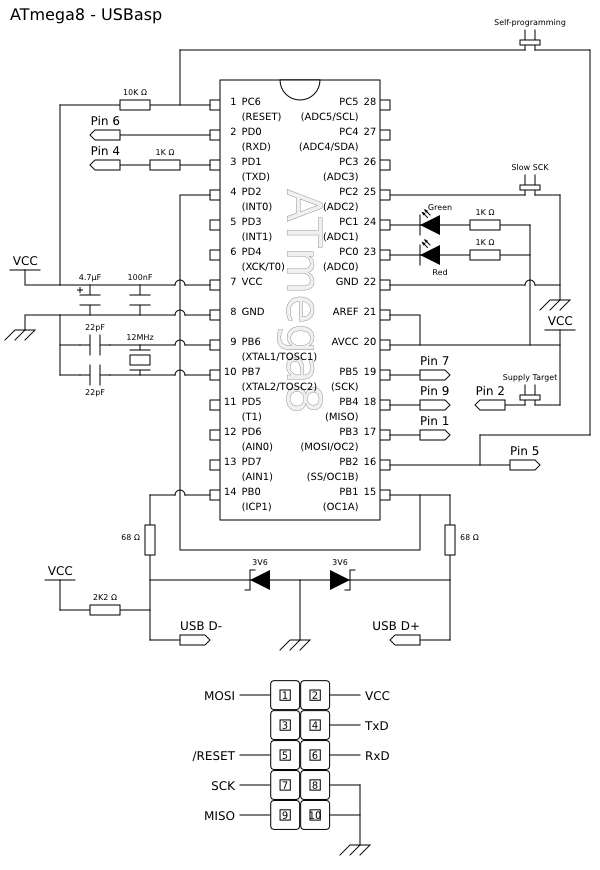
USBasp schematic
USBasp website (Wayback Machine) already contains the circuit schematic (Wayback Machine), however, the layout is a bit confusing because the pin positions don’t match the actual positions from any ATmega8 chip. Thus, in order to build my own USBasp on a breadboard, first I remade the entire schematic from scratch, using the actual pin positions from the DIP version of ATmega8.
If you are an attentive reader, you will notice that I haven’t placed any capacitor on my breadboard, even though they exist in this schematic. Yeah, the circuit works even without them, but it might not be as stable. (to tell the truth, I don’t fully understand why those capacitors are needed, or what are the consequences of removing them)
Go to: part 1, part 2, part 2.1 (video), part 3, part 4 (video), source-code.