In this post, I’m collecting several ideas and PipeWire solutions to real-world audio issues. Some of them are certainly convoluted, and a better solution could be to buy high-end expensive gear; but here I’m having practical usable solutions for a Linux desktop computer.
Getting the PipeWire node name
For some configurations, you need to refer to the PipeWire node name (AKA the device name). There are several ways to get this information.
pw-dump outputs a JSON representation of the current PipeWire state. You can find the node names using a simple grep:
pw-dump | grep 'alsa_input.*analog-stereo'

pw-dump | grep -F '"node.name"'
Or, if you have jq, you can try extracting data from the JSON:
pw-dump | jq '
    .[]
    | select(.info.props."media.class" // "" | contains("Audio"))
    | .info.props."node.name"
'

pw-dump | jq '
    .[]
    | select(.info.props."media.class" | contains("Audio")?)
    | .info.props."media.class" + ": " + .info.props."node.name"
'
pw-cli is a command-line interface for interacting with PipeWire. You can also extract the node names from it:
pw-cli list-objects | grep -F 'node.name'

pw-cli info all | grep -F 'node.name'
pw-dot generates a graphviz-compatible representation of the PipeWire state. That can be viewed by converting it to an image or by using xdot.
pw-top shows a table with the live usage of the PipeWire server, and also includes a row for each sink and source. You may need to enlarge your terminal screen in order see the full node name.
And I’m pretty sure there are other ways to find the device name.
Dual-monitor as stereo speakers
If you have two external displays connected to your computer, and those displays happen to have built-in speakers, you can combine both outputs into a single stereo audio sink.
Built-in speakers on TVs and monitors are usually pretty bad. Combining two will not make them sound better: they will continue sounding bad, but now in stereo. You should seriously consider buying higher quality speakers. Heck, even medium-quality speakers are likely better than built-in monitor speakers. Still, this trick can be useful to some people.
Please make sure you have enabled multiple simultaneous HDMI outputs.
This is the ~/.config/pipewire/pipewire.conf.d/10-dual-hdmi-stereo.conf:
context.modules = [
{
    name = libpipewire-module-combine-stream
    args = {
        combine.mode = sink
        node.name = "dual_hdmi_stereo"
        node.description = "Dual HDMI as Stereo output"

        # Set to true to make the latencies match
        # (by adding delays to the lower latencies).
        combine.latency-compensate = true

        combine.props = {
            audio.position = [ FL FR ]
        }
        stream.props = {
        }
        stream.rules = [
            {
                matches = [
                    {
                        # Pick one of the following ways to select a device:
                        # alsa.id = "HDMI 0"
                        # api.alsa.path = "hdmi:0"
                        # device.profile.name = "hdmi-stereo"
                        # node.name = "alsa_output.pci-0000_00_1f.3.hdmi-stereo"
                        # object.path = "alsa:pcm:0:hdmi:0:playback"

                        media.class = "Audio/Sink"
                        object.path = "alsa:pcm:0:hdmi:0:playback"
                    }
                ]
                actions = {
                    create-stream = {
                        combine.audio.position = [ FL FL ]
                        audio.position = [ FL FR ]
                    }
                }
            }
            {
                matches = [
                    {
                        # Pick one of the following ways to select a device:
                        # alsa.id = "HDMI 1"
                        # api.alsa.path = "hdmi:0,1"
                        # device.profile.name = "hdmi-stereo-extra1"
                        # node.name = "alsa_output.pci-0000_00_1f.3.hdmi-stereo-extra1"
                        # object.path = "alsa:pcm:0:hdmi:0,1:playback"

                        media.class = "Audio/Sink"
                        object.path = "alsa:pcm:0:hdmi:0,1:playback"
                    }
                ]
                actions = {
                    create-stream = {
                        combine.audio.position = [ FR FR ]
                        audio.position = [ FL FR ]
                    }
                }
            }
        ]
    }
}
]
It uses the Combine Stream module to create a new virtual audio device. The FL (Front-Left) is mapped to the first HDMI outputs FL and FR, and the FR (Front-Right) is mapped to the second HDMI outputs FL and FR.
Cheap do-it-yourself surround setup
Of course, please adapt the previous example to your use-case. The documentation even has an example of a virtual surround setup by combining multiple audio sinks together.
Theoretically, you could add a couple of Bluetooth speakers as rear sinks, while you keep your wired speakers as front sinks. Thus, you can have a makeshift surround setup without the dedicated hardware. Given how Bluetooth speakers are relatively cheap, and given how versatile they are (they can be repurposed as the main speakers of any device), this sounds like a great weekend project if you want to watch a movie with surround sound, but you don’t have the budget for a dedicated hardware, nor the desire to keep long wires across your whole room.
I haven’t tried this virtual surround setup. I don’t know how good it sounds. It will certainly need some tweaking to adjust for the latencies, and possibly some equalization. You may also need some speakers with large enough batteries, or speakers that won’t automatically turn off after a few minutes of inactivity. Like I said, it sounds like a nice weekend project to figure out what can go wrong and how to solve it.
If the speakers get disconnected and unlinked from the virtual surround card, you can always re-link them by using pw-link (which you can add to a shell script to automate the setup of your virtual surround), or visually through qpwgraph or Helvum.
Fixing a single-channel mono microphone on a stereo input jack
I once bought a cheap low quality microphone. Even though it was cheap, I feel like I paid to much for it, given the quality. (It was already broken in less than one month.)
That microphone had a 3.5mm jack that I could connect to the Mic In port of the sound card. That sounds simple, microphones and headphones have been using this kind of interface for ages, what could possibly go wrong? Well, even though the microphone was mono (single channel), the jack was TRS (tip-ring-sleeve), which is used for stereo devices. And the microphone circuitry didn’t bother sending any audio data to the right channel, meaning all the captured audio was showing up only on the left channel.
Hearing a microphone recording (or video call) coming from only one of the speakers is already very distracting, but hearing the voice only on one of the ears while wearing headphones is painful. I needed to fix it.
Thankfully, it can easily be fixed.
PulseAudio solution
Even though PulseAudio is old, this solution still works under PipeWire.
The first step is to figure out the device name:
pactl list | grep name | grep input

pactl list short sources
Then we use PulseAudio Remap Source module to create a new source the remaps the channels from the hardware source:
pactl load-module module-remap-source \
    source_name=mono_mic \
    channel_map=mono \
    master_channel_map=front-left \
    master=alsa_input.pci-0000_00_1f.3.analog-stereo
This new audio source will have a single channel corresponding to the FL channel of the hardware source.
Once it’s no longer needed, it’s possible to unload the module:
pactl unload-module module-remap-source
Further reading:
- PulseAudio Documentation
- module-remap-sink and module-remap-source on PulseAudio and PipeWire
- Changing input audio source and setting it to mono at Stack Exchange
- PulseAudio Examples at Arch Linux wiki
PipeWire solution
The documentation for the PipeWire Loopback module includes one example:
This Virtual source routes the front-left channel of a multi-channel input to a mono channel. This is useful for splitting up multi-channel inputs from USB audio interfaces that are not yet fully supported by alsa.
context.modules = [
{
    name = libpipewire-module-loopback
    args = {
        node.name = "virtual_mono_microphone"
        node.description = "Virtual mono microphone"
        capture.props = {
            audio.position = [ FL ]
            stream.dont-remix = true
            node.target = "alsa_input.pci-0000_00_1f.3.analog-stereo.5"
            node.passive = true
        }
        playback.props = {
            media.class = "Audio/Source"
            audio.position = [ MONO ]
        }
    }
}
]
If you don’t want to change configuration files and restart the PipeWire sound server, you can also use the pw-loopback tool:
pw-loopback \
    -n virtual_mono_microphone \
    --capture-props  'audio.position=[FL]   node.target=alsa_input.pci-0000_00_1f.3.analog-stereo.5' \
    --playback-props 'audio.position=[MONO] media.class=Audio/Source'
With some tweaking, you can split up the stereo input into two mono inputs. Thus, if you have two mono microphones and you wire them together as separate channels of an stereo input (with proper cables and adapters), you can still split them up by software.
Further reading:
- module-loopback on PulseAudio and PipeWire
- PipeWire Module: Loopback
- Card profile to split stereo input into multiple mono inputs
- Automatically create remap/null-sink devices for muiltichannel interfaces and the example code
- Example Alsa UCM configuration for a specific device
- PipeWire Examples at Arch Linux wiki
Null devices, the general-purpose PipeWire node
(Note: technically, there is a difference between a node and a device. I don’t understand the difference yet, and I’m using those terms interchangeably.)
The most general-purpose virtual device in PipeWire is the Null device. It shows up as a node in the graph, but it is not mapped to any real device. It’s up to the user to route audio to it or from it.
For instance, I once tried launching an application that required a microphone on the system. Even if the microphone usage was optional in the application, it would still refuse to launch if there were no microphones. Thus, by having a virtual Null device behaving as an audio source, the application launched just fine.
Or maybe you want to have all the playback audio to be muted, except for your music player. You could have a virtual Null device as the default audio sink, so all applications (even those brief notification sounds) will play sound to nowhere. Then, after you start playing your music, you re-route just the music player to your headphones.
Or maybe you have an application that doesn’t allow changing the selected audio device after the initial setup. Maybe it’s a VoIP or video-conferencing tool. You could try re-wiring the audio on-the-fly using qpwgraph, but maybe the application doesn’t like that and crashes or misbehaves. Instead, you could have a source Null device and a sink Null device, and let the application use that. Then you can dynamically connect the Null devices to your desired sources and sinks.
You can even recreate all the other examples mentioned in this article using just Null devices. (I don’t know what are the advantages or disadvantages of either approach.)
There are so many possibilities!
This is the ~/.config/pipewire/pipewire.conf.d/10-null-devices.conf:
context.objects = [
{
    factory = adapter
    args = {
        factory.name     = support.null-audio-sink
        node.name        = "null-stereo-output"
        node.description = "Null Stereo Output"
        media.class      = Audio/Sink
        object.linger    = true
        audio.position   = [ FL FR ]
        monitor.channel-volumes = true
    }
}
{
    factory = adapter
    args = {
        factory.name     = support.null-audio-sink
        node.name        = "null-mono-input"
        node.description = "Null Mono Input"
        media.class      = Audio/Source/Virtual
        object.linger    = true
        audio.position   = [ MONO ]
        monitor.channel-volumes = true
    }
}
]
Note: the monitor.channel-volumes parameter is required to make the volume control work.
It creates one virtual stereo audio sink (output) device, and one virtual mono audio source (input) device.
It’s also possible to use pw-cli to create them dynamically:
pw-cli create-node adapter '{
    factory.name=support.null-audio-sink
    node.name=null-stereo-output
    media.class=Audio/Sink
    object.linger=true
    audio.position=[FL FR]
    monitor.channel-volumes=true
}'
pw-cli create-node adapter '{
    factory.name=support.null-audio-sink
    node.name=null-mono-input
    media.class=Audio/Source/Virtual
    object.linger=true
    audio.position=[MONO]
    monitor.channel-volumes=true
}'
And to destroy them:
pw-cli destroy null-stereo-output
pw-cli destroy null-mono-input
Further reading:
- Virtual Devices: Single Nodes at the PipeWire Wiki, which also includes several equivalent examples using PulseAudio’s Null Sink module.
- module-null-sink and module-null-source on PulseAudio and PipeWire
Mysterious undocumented parameters
The PipeWire wiki additionally adds adapter.auto-port-config, but I couldn’t find any documentation for it. It’s used by the src/modules/module-adapter/adapter.c source-code, and it calls do_auto_port_config(). By looking at the source-code:
modecan be one of:none,passthrough,convert,dsp.monitorandcontrolcan be boolean values. (1ortrueare true, anything else is false.)positioncan be one of:unknownorauxorpreserve.
I don’t know what is their purpose nor how they affect the overall behavior of these (virtual) devices.
Debugging
Remember to restart PipeWire sound server each time you change a configuration file:
systemctl --user restart pipewire
You can read the PipeWire messages (and the WirePlumber messages):
journalctl --user-unit=pipewire --user-unit=wireplumber -f
Latency measurement
You can try measuring the overall audio latency by inserting jack_iodelay in an audio loop in your system:
jack_iodelay
Please read the manpage to understand how the tool works. Basically, you use any JACK-compatible tool (like qpwgraph or pw-link) to connect the tool output (which generates some audible noise) to your audio path. Then you connect the audio capture back into the tool, which will then be able to measure the latency between generating the signal and receiving it back.
For instance, to measure the latency from your sound card speakers back into your sound card microphone:

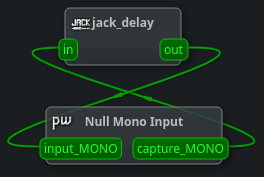
You can also measure the latency around one or multiple PipeWire nodes. Here, it’s measuring the latency of a single Null node:
This can be useful if you introduce audio processing nodes, such as equalizer or other effects.
Tweaking the parameters to give better latency is left as an exercise to the reader. Also, feel free to share your knowledge on this subject.