If you have Bluetooth or USB headsets connected to your computer, they will show up as a separate sound devices next to your built-in audio chip. They even have their own volume sliders, and it’s trivial to change which should be the default device. However, the same cannot be said about the built-in headphone jack and the connected HDMI/DisplayPort monitors. Toggling between those is hidden away in a confusing drop-down menu. Why can’t they behave just like the headsets I have just mentioned?
TL;DR: Jump to Writing a custom profile for quick instructions. But don’t copy them blindly, please read enough so you can understand what you are doing.
My system
I have an HP ProDesk 600 G2 Mini computer. Even though it is a desktop computer, its audio capabilities are similar to any modern laptop:
- It has an Intel HD Audio chip.
- It has a built-in headphone jack. (Actually, it has two jacks, the second one is for the microphone.)
- It has a terrible built-in speaker.
- It has two DisplayPort ports (and one VGA port). It can send audio to the connected displays.
- Although this machine doesn’t have HDMI output, the audio system still labels the DisplayPort outputs as HDMI. So, for the rest of this article, please consider HDMI and DisplayPort as synonyms.
- Laptops usually have one HDMI or DisplayPort output and a second one over USB-C; or multiple display outputs via USB-C.
- It has built-in Bluetooth support that can connect wirelessly to headphones/headsets or speakers.
- It has USB ports that can connect to wired headphones/headsets/microphones.
Even though I’m focusing on my own computer for this article, you can observe the many similarities with any modern laptop. Thus, anything discussed in this article is applicable to most users.
I’m running Manjaro Linux on x86_64 architecture, with KDE Plasma 5.27 and PipeWire 0.3.83 (1.0RC3). Any modern distro that ships with a recent PipeWire sound server would behave the same. And even though the screenshots here are from KDE, the same concepts are valid to any desktop environment with minor UI changes.
The problem
- It is easy to change the audio playback to or from a Bluetooth/USB headset, but it is hard to do the same with HDMI outputs and the headphone jack.
- It is easy to play audio simultaneously on Bluetooth/USB devices together with the headphone jack, but it is impossible to do the same with HDMI outputs and the headphone jack.
Why?
Can we “fix” it?
To better understand the problem, I’ve prepared screenshots for two scenarios. In fact, these are interactive screenshots! You can click on them to simulate the behavior of a real system.
Scenario 1: multiple devices
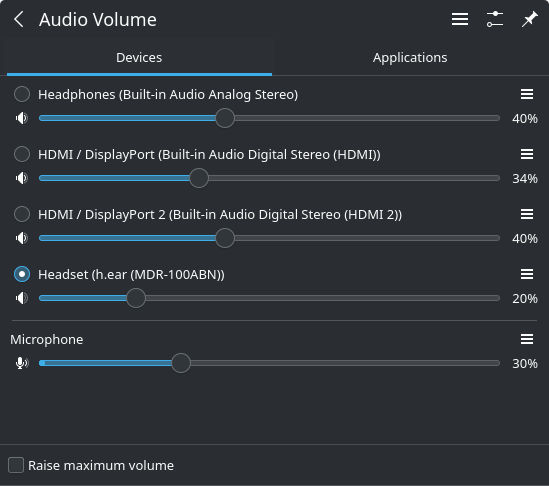
The following is the audio mixer interface that shows up on KDE when I click on the speaker icon at the system tray. For this scenario, I have a Bluetooth headset connected.
You now have one task: make the audio play on the other device. If the Bluetooth is headset is selected, make it play on the HDMI device; and vice-versa. (This is just a demonstration screenshot, no real audio will be played. In fact, there is no JavaScript here.)
Please click/tap this interactive screenshot:
Have you managed to do it?
Easy enough?
Simple enough?
Intuitive enough?
Quick enough?
Yes, the solution is simple. There is a radio button beside each device, and clicking on that button or on the device name is enough to change the default audio device. Simple, intuitive, and with a large enough area that it is easy to click.
In fact, that “Play all audio via this device” menu item is the wrong solution. That menu item does absolutely nothing. (It is likely a leftover from PulseAudio.)
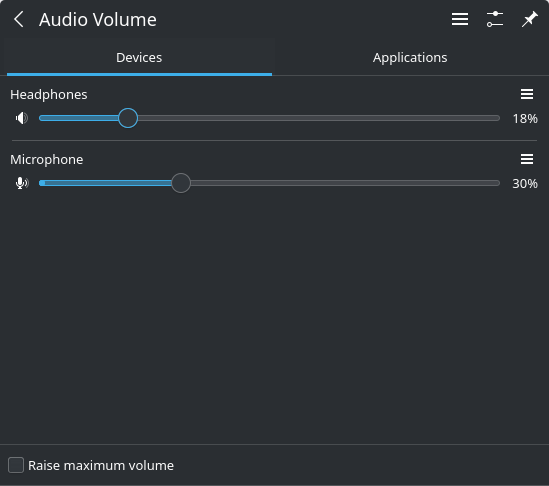
Scenario 2: multiple profiles on the same device
Now, let’s disconnect the Bluetooth headset. Instead, you now have a wired analog headset connected to the headphone jack.
Your new task: enable audio over HDMI. That means the audio should be played through one of your two monitors. Be aware, you don’t want to disable your microphone. You want to only change the audio output and nothing else. Afterwards, change the audio back to the headset.
Please click/tap this interactive screenshot:
Have you managed to do it?
Not yet?
How long did it take?
How many clicks?
How many tries and missteps?
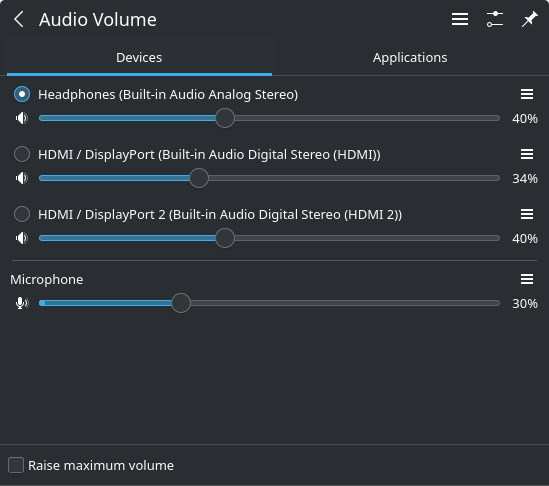
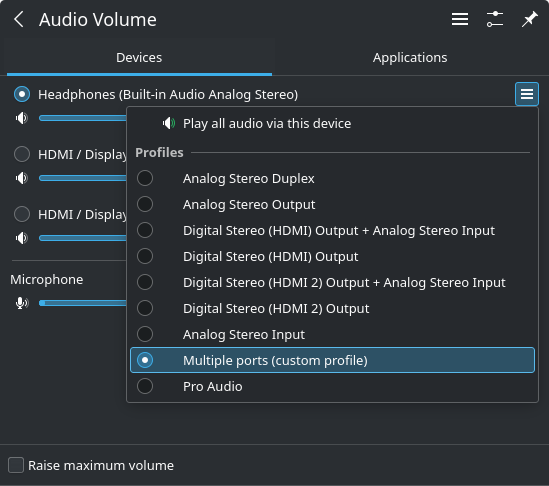
The solution, in this case, is to click on the hamburger button and then select a new profile.
Don’t click on the settings button at the top bar. Also don’t click on the identical hamburger button at the top bar: you have to click on the correct button, the one next to your device.
You then stop for a couple of seconds reading the several menu items. Eight items in this case, six if you only have one display, or at least ten items if you have more displays. They all have similar names. Click on the correct menu item. Be careful, if you click on the wrong one, you either lose (disable) one of your audio devices, or the audio goes somewhere else. Then you have to repeat the steps.
Compare this second scenario with the first scenario. Why is it so much slower and painful than the first scenario?
Scenario comparison
On the first scenario, the interface immediately exposes the controls needed to change the output device: the radio button. It is also located near the device name, making it easier to click on the correct button.
On the second scenario, the required controls are hidden. You can’t know immediately how to achieve your objective, you are forced to explore. Additionally, the hamburger button is located on the other side, far away from the device name, making it more difficult (and slower) to know for sure if you are clicking on the correct button.
There is also the Fitts’s law: the time required to rapidly move to a target area is a function of the ratio between the distance to the target and the width of the target. In other words, if you need to click on something, you will be slower if the target is further away, or if the target is small. For the first scenario, both the radio button and the device name are clickable, with an effective target area of several thousands of pixels. For the second scenario, only the tiny hamburger button is clickable, a 24x24 area that is around half thousand pixels. It’s easy to see that the targets for the first scenario are much easier to hit than the targets for the second scenario.
And, finally, after you manage to hit the hamburger button, you are faced with a new decision. It takes time to parse the pop-up menu, read the options, evaluate which one is the correct option, and finally click on it. The menu items are also very close together, so misclicking will select the wrong profile; while on the first scenario there is more whitespace around each target, so misclicking is mostly harmless.
Available profiles
Let’s take a closer look at the profiles available from the hamburger button:
| Profile | Both input and output |
|---|---|
| Analog Stereo Duplex | ✅ |
| Analog Stereo Output | 😡 |
| Digital Stereo (HDMI) Output + Analog Stereo Input | ✅ |
| Digital Stereo (HDMI) Output | 😡 |
| Digital Stereo (HDMI 2) Output + Analog Stereo Input | ✅ |
| Digital Stereo (HDMI 2) Output | 😡 |
| Analog Stereo Input | 😡 |
| Pro Audio | 😨 |
Half of the options will disable either the audio playback or the audio capture. I think it’s safe to assume the majority of the users would prefer to keep them both enabled, as people want to listen to music or do voice/video calls. And people can also just mute each device, which is easy to do and easy to undo. (Just click on the speaker icon, or press the keyboard shortcut.) Meanwhile, disabling an audio device takes more time to troubleshoot, takes more steps to re-enable, and may need relaunching certain applications before using the device again.
The “Pro Audio” profile makes sense if you have professional gear or if you are working with audio seriously. For the average end-user, it is just confusing and intimidating.
Overall, for the average end-user, less than half of the menu items are useful.
To make matters worse, the profiles have similar-looking names. The two topmost profiles have the same amount of letters, differing on only 4 out of the 18 letters. The words “Duplex” and “Output” have a similar shape (if you squint your eyes they look identical), which means at a glance you don’t know which option is the one you want. You have to stop and read carefully the last word.
There is also the semantic overhead. The user wants to change the audio output, so it is natural to choose Analog Stereo Output. Unfortunately, that is a mistake, because that will disable the microphone. Instead, you have to select the Duplex option. Once the user learns that, the user may expect to find duplex options when selecting the HDMI output, but that’s not the case. For HDMI, the correct options have the format HDMI + Analog Input, which clearly communicates the dual nature of the profile. But… Why can’t the analog profile be named Analog Stereo Output + Analog Stereo Input, to make it consistent with the other profiles?
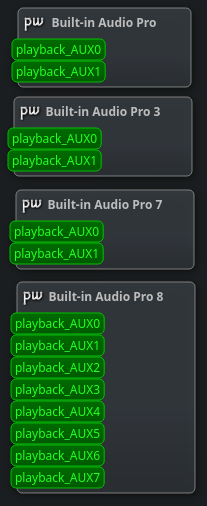
Trying out the Pro Audio profile
When selecting the Pro Audio profile, many audio sinks are made available simultaneously. They are unfortunately named just numerically, making it impossible to know what they are without trial-and-error. Some sinks may even expose more than two channels. It is intimidating, and not user-friendly.
By default it also has all the volume sliders at the maximum volume. Accidentally switching to this profile while any sound is being played will make the output unexpectedly very loud, further scaring away and intimidating the user.
Additionally, Pro Audio devices may just outright not work as you expect. Sometimes sound will be played correctly, other times it won’t, leading to just static noise or silence. In fact, PipeWire’s FAQ says the following regarding the Pro Audio profile:
For consumer cards with stereo or surround configurations, it does not make sense to use this Profile.
I believe the only people who should use the Pro Audio profile are the ones who know how it works and have a very specific need. If you are questioning if you should use it, then you probably shouldn’t.
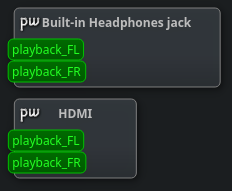
With a tool like qpwgraph or Helvum, it is possible to route PipeWire to play sounds simultaneously on different nodes. If that is possible using the Pro Audio profile, can we achieve the same using a normal profile?
Yes, we can!
Exploring possible solutions
The first hint comes from a forum thread regarding writing a custom PipeWire profile. They suggest:
Quick fix: edit
/usr/share/alsa-card-profile/mixer/profile-sets/default.confand uncomment the literal example at the end of the file
That’s a good starting point. It’s still bad advice to modify a system-wide configuration file that may be overwritten on the next package update, but still a good hint on what to look for.
If you look at the end of that file, there is no commented-out example anymore. It was moved to 9999-custom.conf in this commit. That’s great! We now have a specific file where we can put our own custom profiles!
So far, we’ve only looked at two files. What else is in that profile-sets directory? Well, a lot of custom profiles for specific devices. These profiles reference paths that are defined in /usr/share/alsa-card-profile/mixer/paths/. But how does the system know which profile to use for each hardware device? By the udev rules defined in /usr/lib/udev/rules.d/90-pipewire-alsa.rules.
All these configuration files were originally imported from PulseAudio into PipeWire, and they are installed by the alsa-card-profiles package.
I don’t fully understand all the pieces, but thankfully I don’t need to.
Writing a custom profile
The file 9999-custom.conf includes the following example:
; An example for defining multiple-sink profiles
#[Profile output:analog-stereo+output:iec958-stereo+input:analog-stereo]
#description = Foobar
#output-mappings = analog-stereo iec958-stereo
#input-mappings = analog-stereo
That’s promising, we want a custom profile with multiple sinks for our built-in audio device.
Custom profile: headphone jack + 1 HDMI output
Try adding the following lines to /usr/share/alsa-card-profile/mixer/profile-sets/9999-custom.conf:
[Profile output:analog-stereo+output:hdmi-stereo+input:analog-stereo]
description = Multiple ports (custom profile)
output-mappings = analog-stereo hdmi-stereo
input-mappings = analog-stereo
You can’t use a simple identifier like [Profile multiple-ports], as that won’t work. I don’t understand why, and I couldn’t find any documentation. (If you find the documentation, please contact me, and I’ll link to it.)
Since you need super-user permissions to modify that file, you may want to run:
sudoedit /usr/share/alsa-card-profile/mixer/profile-sets/9999-custom.conf
Save and close the text editor, then restart the PipeWire daemon (without sudo, because the sound server runs as your own desktop user):
systemctl --user restart pipewire
Open the audio mixer interface and select your newly-created custom profile. Success! We can finally easily select the output device!

And since these two audio sinks are now available, we can use qpwgraph to route audio to both sinks simultaneously. To make it even simpler, we can double-click on the node names (inside qpwgraph canvas) to rename them.
Custom profile: headphone jack + multiple HDMI outputs
What if you have multiple HDMI outputs? No problem, you can add them. However, you must know how many HDMI outputs you have beforehand. If you add a profile using HDMI ports not supported by your sound chip, that profile will be discarded.
Here’s the example for two HDMI outputs:
[Profile output:analog-stereo+output:hdmi-stereo+output:hdmi-stereo-extra1+input:analog-stereo]
description = Multiple ports (custom profile)
output-mappings = analog-stereo hdmi-stereo hdmi-stereo-extra1
input-mappings = analog-stereo
Here’s the example for three HDMI outputs:
[Profile output:analog-stereo+output:hdmi-stereo+output:hdmi-stereo-extra1+output:hdmi-stereo-extra2+input:analog-stereo]
description = Multiple ports (custom profile)
output-mappings = analog-stereo hdmi-stereo hdmi-stereo-extra1 hdmi-stereo-extra2
input-mappings = analog-stereo
Here’s the example for four HDMI outputs:
[Profile output:analog-stereo+output:hdmi-stereo+output:hdmi-stereo-extra1+output:hdmi-stereo-extra2+output:hdmi-stereo-extra3+input:analog-stereo]
description = Multiple ports (custom profile)
output-mappings = analog-stereo hdmi-stereo hdmi-stereo-extra1 hdmi-stereo-extra2 hdmi-stereo-extra3
input-mappings = analog-stereo
And so on… I believe you can go up to 11 HDMI outputs.
How many audio outputs do you have?
The amount of available HDMI outputs of your sound card may be different than the amount of physical HDMI connections of your machine. To know the exact amount, you can ask ALSA for information, using a tool from alsa-utils packages:
alsactl info
Which shows this output for me:
- card: 0
  id: PCH
  name: HDA Intel PCH
  longname: HDA Intel PCH at 0xe1144000 irq 128
  driver_name: HDA-Intel
  mixer_name: Realtek ALC221
  components: HDA:10ec0221,103c8056,00100103 HDA:80862809,80860101,00100000
  controls_count: 43
  pcm:
    - stream: PLAYBACK
      devices:
        - device: 0
          id: ALC221 Analog
          name: ALC221 Analog
          subdevices:
            - subdevice: 0
              name: subdevice #0
        - device: 3
          id: HDMI 0
          name: Q27P1B
          subdevices:
            - subdevice: 0
              name: subdevice #0
        - device: 7
          id: HDMI 1
          name: Q27P1B
          subdevices:
            - subdevice: 0
              name: subdevice #0
        - device: 8
          id: HDMI 2
          name: HDMI 2
          subdevices:
            - subdevice: 0
              name: subdevice #0
    - stream: CAPTURE
      devices:
        - device: 0
          id: ALC221 Analog
          name: ALC221 Analog
          subdevices:
            - subdevice: 0
              name: subdevice #0
Alternatively, you can use aplay -l and arecord -l, as they display mostly the same information, but in a different format.
I can observe:
- Device 0 is the analog headphone jack.
- Devices 3 and 7 are real HDMI/DisplayPort ports that are currently connected to AOC Q27P1B monitors.
- Device 8 is a mystery. Maybe the chip has support for a third digital output, but the motherboard doesn’t have it. I don’t know.
I can also notice that these numbers are mapping exactly to the Pro Audio devices shown earlier. (Wouldn’t it be great if PipeWire used the device name instead of the number?)
User-writable configuration
We have modified a system-wide configuration file, which, depending on your distro, will be overwritten on the next package upgrade. But since PipeWire runs as a normal user, it should be possible to set your own configuration somewhere inside ~/.config/…, right? Well, it sounds reasonable, but I don’t know if it is possible.
PipeWire wiki says:
A large part of the initial configuration of the devices is performed by the session manager. It typically loads the alsa devices and configures the profiles, port volumes and more.
WirePlumber is the recommended session manager that most people will be using. WirePlumber documentation says:
Use the ACP (alsa card profile) code to manage the device. This will probe the device and configure the available profiles, ports and mixer settings. The code to do this is taken directly from PulseAudio and provides devices that look and feel exactly like the PulseAudio devices.
So, indeed it is replicating the PulseAudio behavior, which explains why all of those configuration files are still mentioning PulseAudio. However, most of the code relating profiles is in pipewire itself. There are very few occurrences of ACP (Alsa Card Profile) in WirePlumber.
Digging deeper, I found that PipeWire has some logic for resolving paths. It seems to look at ACP_PATHS_DIR and ACP_PROFILES_DIR environment variables, as well as ~/.config/alsa-card-profile/ and /etc/alsa-card-profile/, before falling back to /usr/share/alsa-card-profile/mixer/ (or whatever the prefix or datadir was configured during compilation time). This is a new behavior introduced a couple of days ago, and not yet available on the PipeWire version of my system.
It seems other people also want to override the configuration per-user. Well, hopefully that will be possible in a future version. (Maybe already possible by the time you read this.)
Custom profile per device
If you have a more complicated setup, you might want to have a custom profile per card, instead of modifying the default profile. There are multiple ways to achieve that.
You can create your own udev rules, similar to those in /usr/lib/udev/rules.d/90-pipewire-alsa.rules. Please choose a path that won’t be overwritten on your next system update, and remember to ask udev to reload the rules while you are testing them. udev’s article at Arch Linux wiki is a great resource.
Alternatively, you can configure a device-specific profile using WirePlumber, as mentioned in its documentation.
Either way, doing so is left as an exercise to the reader.
Looking back
We improved from this:
To this:
By creating a custom ALSA card profile that can be selected from any PulseAudio/PipeWire configuration GUI:
These steps should be applicable to any modern distro using PipeWire, and the results will be available in any desktop environment (KDE, Gnome, XFCE, etc.).
With this, switching between the headphone jack or the HDMI outputs is as easy as switching to a Bluetooth/USB headset.
Not just that, but it is also possible to simultaneously play audio on all of those devices.
Conclusions
PipeWire is awesome! It’s not perfect, the documentation can be better, but it is still great.
There are a few improvements I’d like to see:
When selecting the Pro Audio profile, it would be more helpful to use the device names (e.g. HDMI 1) instead of generic names (e.g. Built-in Audio Pro 7). I’ve reported it as issue 3638.
It would be great to have an automatically-generated profile that enables all available input and output ports. We already have an option auto-profiles = yes that generates profiles “by combining every input mapping with every output mapping”. This logic is a relic from the PulseAudio days and it creates n × m profiles. With PipeWire, it would be great to have one complete auto-generated profile, similar to the custom profile created in this article. I’ve reported it as issue 3637.
Further reading
- Writing pulseaudio profiles on freedesktop.org
- Simultaneous HDMI and analog output from PulseAudio Examples at Arch Linux wiki (mostly obsolete, but still has some interesting scenarios)